Thursday, April 29, 2010

Savory Herb and Goat Cheese Turnovers


Although this blog has so far featured delicious desserts, baking can be so much more. Even beyond lasagna or other main course, single dish bakes, as far as I'm concerned the oven has earned a rightful spot in the preparation of some of the most stunning and mouth watering appetizers. This past weekend I went to my favorite Spanish tapas restaurant and ordered a small plate of goat cheese empanadas with a drizzle of a tomato based sauce. It is now Thursday and I've been salivating over those empanadas since then! And, in the spirit of expanding my baking repertoire, below you will find a simple and classy savory appetizer, with the total prep time taking about 15 minutes and another 15-20 baking.

Savory Herb and Goat Cheese Tunovers
1 package of Peppridge Farm pastry sheets (2 sheets), room temperature. (Cover with a damp paper towel once unwrapped)
2 4oz packages of fresh goat cheese (President is a good brand)
1 tsp garlic, minced
3/4 tsp basil
1/4 tsp freshly ground pepper
dash salt
dash red pepper flakes
flour, for rolling dough
1 tblsp milk
3 tblsp butter, melted

Preheat oven to 350. Line a baking sheet with either foil or parchment paper. In a medium sized bowl, crumble goat cheese and add garlic, mixing with a fork or your hands. Add basil, pepper, red pepper flakes, and salt to taste (above is a guideline for what I used), and mix well. From one sheet of pastry, cut into thirds along the pre-cut perforations. Taking one of the strips, lay horizontally on a surface lightly dusted with flour. Roll dough very thinly (1/8 inch thick), cut into squares or rectangles with a sharp knife and place the goat cheese mixture in the center of the dough - I used approximately 2 slightly heaping tsp/square. Moisten the edges of the pastry dough with milk, and then fold dough in half to cover the filling and seal edges by pressing together with a finger. If triangle turnovers are made, fold the dough over along the diagonal. Melt butter, and using a pastry brush, brush butter over the tops of the turnovers. Place on the foil or parchment paper covered baking sheet and bake at 350 for 15-20 minutes, or until the edges are golden brown.

Enjoy!

Thursday, April 22, 2010

Marzipan Cherry Scones


I’m actually writing this recipe before I’ve even tasted it – they are still in the oven. I just have this feeling… they will be THAT good! (*UPDATE* they ARE that good!) Today at work, a friend of mine was describing these marzipan scones she enjoys at a local coffee shop that she frequents. I had already been thinking about baking something for our weekly Friday meeting. At this point all I heard was “… marzipan… scones… delicious… my favorite,” and I was sold. I’ve never made scones before, so it was a perfect challenge! Design a delicious scone recipe that incorporates only my most favorite and beloved flavor in baking… marzipan.

The perfect scone recipe for me would have more than just the sweet scent of almond with flecks of flavorful marzipan, but the tang of cherries. To give the recipe an extra zing, I soaked the dried cherries in amaretto first, allowing the cherries to soak up the delicious, sweet almond flavor of the amaretto.

Marzipan Cherry Scones
1/2 cup dried cherries, soaked in amaretto (I used a mixture of bing and montmerency cherries)
2 cups all purpose flour
2 tsp baking powder
1/3 cup sugar
¼ tsp salt
6 tblsp butter, cubed and cold
1/3 cup heavy cream (or half and half)
1 large egg
½ tsp almond extract
1/3 cup marzipan, sweetened to desired sweetness by kneading in confectioner’s sugar
turbinado sugar, for decoration

Mix dry ingredients together in a large bowl. Using a pastry cutter, cut in the cubed butter and about half of the marzipan until they resembles small peas. Add the cherries and the remaining marzipan in small chunks. In a small bowl, combine almond extract, heavy cream, and egg and lightly beat together. Pour wet ingredients, reserving about 1 tablespoon, over the dry ingredients and mix together until the mixture holds together (do not over-mix). Turn dough out onto a floured surface and form a circular disc. Cut into 8 pieces from the center, as one would cut a pie. Place on a parchment paper lined cookie sheet and brush with remaining cream and egg mixture. Top with turbinado sugar for decoration. Bake in a preheated oven at 375 for 15-20 minutes, or until light golden brown around the edges.

Monday, April 19, 2010

Almond Spritz Butter Cookies


You know how sometimes baking leaves you with random misfit ingredients that just don’t make the cut? Making that delicious custard ice cream leaves you with 7 egg whites that you just don’t know what to do with, or how making the cakes described above, including the cherry and/or spice cake leaves you with a fridge full of egg yolks? This post uses up some extra egg yolks, resulting in a most delicious and simple dinner party approved cookie – the spritz cookie. When I finished making all of the spice and cherry cakes for the baby shower, I had a whopping total of 16 egg yolks left over, so I had some serious make-up baking to do! Spritz cookies immediately (well ok, after the many thoughts of ice cream) came to mind. As a child my mom would make spritz butter cookies in the shape of trees every Christmas, complete with green sprinkles. And, these almond flavored butter cookies made with her old cookie press never even lasted long enough to make it to the plate destined for Santa and his reindeer. But, given the current excess egg yolk situation, I decided to break from the mold and make these cookies in, yes, April, and choose another cookie press shape.

Almond Spritz Butter Cookies
1 cup of butter (do not substitute more than ½ cup with margarine as it changes the texture of the cookie and the aesthetic of the pressed shape)
2/3 cup sugar
3 egg yolks
1 tsp almond extract
2 ½ cup flour

Heat oven to 400 degrees F. Using an electric mixer, mix butter, almond extract and sugar until thoroughly light and fluffy. Mix in the flour in several stages – in the end you want a thick dough that hold together well – not excessively sticky. If you have to use a little more flour than the recipe recommends, do so one tablespoon at a time.

Take pieces of the dough and roll it into tube and fit it into the cookie press. Press out the cookies onto a foil lined cookie sheet and bake for 7-10 minutes until light golden brown on the edges.

*If you do not have a cookie press, roll out the cookie dough between two pieces of parchment paper (NOT FLOUR) and cut out using cookie cutters. Alternatively, bed bath and beyond sells cookie presses for $20. Enjoy!

Wednesday, April 14, 2010

Spice Cake


The sister cake to the previous post’s cherry cake is the spice cake. A velvety, mildly spicy spice cake iced with a vanilla buttercream including the same spices in the cake made for a harmonious blend of flavor and another cake well-worth making. I'll post the vanilla-spice buttercream in another post.

Spice Cake
1 stick butter, softened
1½ cups sugar
2 tsp vanilla extract
4 egg whites
1¼ cup milk (I use half ½ and ½, half 1% milk)
2¼ cups cake flour
1 tblsp baking powder
1½ tsp cinnamon
1 tsp nutmeg
1 tsp cloves
½ tsp ginger
pinch salt

Cream butter and sugar with a mixer until light and fluffy and then some – approximately 3 minutes. Add the vanilla extract, beating thoroughly. In a separate bowl, whisk together the egg whites and the milk/½ and ½. In another separate bowl, combine all dry ingredients and mix well. Add 1/3 of the dry ingredients to the butter/sugar/juice mixture, and mix until incorporated. Add half of the wet ingredients and mix until incorporated, scraping the sides of the bowl as needed. Add half of the remaining dry ingredients and again mix until incorporated. Add the last half of the wet ingredients, mixing until incorporated. Lastly, add the remaining dry ingredients and mix until incorporated, and then mix for an extra few minutes at the end. Pour batter into cake pans prepared by spraying with nonstick cooking spray (or rubbed in butter) and coated with a light layer of cake flour. Bake in a preheated oven set to 350 degrees F until a toothpick in the center comes out clean, approximately 30-35 minutes for a 10 inch round.

As the pictures show, I made this cake a two-layer cake where each layer was made from two cake rounds. This cake recipe makes two 10 inch rounds. I doubled this recipe to make the cake as pictured. After the rounds cooled, I filled and iced them with a vanilla spice buttercream frosting before covering in fondant.

Cherry Cake


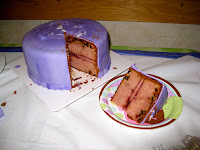
For most of March I had my baking cut out for me – it was the month of perfecting several recipes for a job I was recruited for. A friend of mine was organizing a baby shower for a close friend, and asked me to bake a cake to serve 40 people and that could withstand a 3 and a half hour car ride, in either of her friend’s favorite cake flavors: cherry or spice cake. This already sounded like a challenge! I decided for ease in transport, I would make two, two layer cakes, one spice and one cherry, so we could all have our cake and eat it too… literally. ☺ I didn’t have to subject myself to the nightmares of a 3 layer cake toppling over with abrupt braking on the highway during the 3+ hour car ride, and the mother-to-be could enjoy both of her favorites on her special day. I had never made a cherry cake, and knew that this would be a perfect challenge for me – reinvent a cherry cake bursting with authentic cherry flavor and pieces of the tart fruit to match. Spice cake, on the other hand, seemed like it would be less of a challenge, so I knew where I would start. I decided to bake a few practice cakes to get the cherry cake down, which ended up being a harder job than I had anticipated, but full of humor nonetheless. Of course I have to share those with you, but, feel free to skip down to the widely enjoyed and approved final cake recipe below. ☺ I know you will enjoy it too.

The first two efforts found me back at the local grocery store, purchasing marachino cherries and at Trader Joe’s buying several bags of the Montmorency dried tart cherries, which I’ve been known to eat by the fistful… they are just that good. I made one cake in which I made a white cake batter, and added some of the marachino cherry juice as well as diced up marachino cherries. This cake was much too subtle and had an artificial cherry flavor… maybe great for a small child’s cake, but as this cake was to suit 40 grown adults, I kept looking. I made a white cake in which I rehydrated the dried cherries and added them to the batter. This ended up being more like a coffee cake with cherries that sunk to the bottom because they were too heavy. Tasted good, especially the bites at the bottom of the cake, ☺ but just not very cherry. It tasted like what it was – a white cake with some moist cherries in it.

Then, I decided to get creative. Where can I buy cherry juice? Cherry extract? Hmmm… I spent some time online, and settled on two products. From King Arthur Flour (www.kingarthurflour.com) I purchased their “natural” cherry flavored extract. Looking back on the experience I already cringe at the thought of baking with this stuff EVER again. I also did some research and found that concentrated cherry juice is sold by heath food stores (and the online the web from http://www.brownwoodacres.com) and is intended as a supplement for joint pain, but the list of ingredients is still only one thing: Montmorency Tart cherry juice. I happily purchased both cherry items and eagerly awaited their arrival on my doorstep to test in baking. Finally they arrived, and I quickly got to work making a white cake containing the concentrated cherry juice and rehydrated cherry pieces that I cut into smaller pieces in hopes they would not sink to the bottom. I whipped this up, and tasted the batter… and DAMN it was good! But of course, I couldn’t let it be! I went and added 1/8 tsp of the cherry extract…1/8 tsp! Hardly ANYTHING! I tasted the batter… eh… too early to tell. Certainly tasted like cherries, but was it a good cherry flavor?

Finally it was done and I rushed to try it. It tasted like a fake cherry factory exploded in the cake. Andreas tasted it, and even he, my reliable cake testing guinea pig told me he felt like he was going to be sick. So I guess adding the natural cherry extract produced a flavor of anything but? And, all with 1/8th a tsp!! In the end, I didn’t have the heart to bring the sample cake to work, for my co-workers/taste testers to only belittle my cake-making self esteem even more, or worse, make them too feel nauseous. The cake instead found a home in the garbage, and I chalked it up to a ‘learning experience.’

But, despite this cake going extremely wrong, it seemed easy to fix. Don’t add any of the cherry extract. In addition, the cherry juice is made from tart cherries, so I thought my next (and what I was pretty convinced would be my last!) test cake should have an increased amount of sugar to balance the tartness of the juice. Additionally, to keep the pieces of rehydrated dried cherries far away from the bottom of my cake pan, I decided I would dredge the chopped up cherries in cake flour before lightly mixing them into the finished batter. I excitedly made this cake, promised Andreas it would be good, and we both tried it. I am proud to say it was the best cherry cake I’ve ever eaten, and being a person who prefers fruit to chocolate, this is one of my most favorite cakes I have ever eaten. Even Andreas, who eternally will prefer chocolate cake to anything else, agreed it was delicious and should be tried by all. My co-workers/taste testers all agreed, and it is with that I share probably my most prized recipe yet with you… and I daresay it was well earned after all those sample cakes!

Cherry Cake
1 stick butter, softened
2 cups sugar
2 tsp almond extract
½ cup Montmorency cherry juice (http://www.brownwoodacres.com)
4 egg whites
1½ cup milk (I use half ½ and ½, half 1% milk)
2 ½ cups cake flour
1 tblsp baking powder
pinch salt
½ cup – 1 cup dried Monmorency cherries, rehydrated in water and dredged in cake flour

Cream butter and sugar with a mixer until light and fluffy and then some – approximately 3 minutes. Add the cherry juice and the almond extract, beating thoroughly. In a separate bowl, whisk together the egg whites and the milk/½ and ½. In another separate bowl, combine all dry ingredients and mix well. Add 1/3 of the dry ingredients to the butter/sugar/juice mixture, and mix until incorporated. Add half of the wet ingredients and mix until incorporated, scraping the sides of the bowl as needed. Add half of the remaining dry ingredients and again mix until incorporated. Add the last half of the wet ingredients, mixing until incorporated. Lastly, add the remaining dry ingredients and mix until incorporated, and then mix for an extra few minutes at the end. In a small, microwave safe bowl, add dried cherries and cover with water. Cook for a few minutes in the microwave to rehydrate, drain cherries, and cut into smaller pieces (each cherry, maybe 4 pieces). Towel dry cherry pieces, and then mix with cake flour to coat. Add cherries to the cake batter and lightly stir in with a spoon. Pour batter into cake pans prepared by spraying with nonstick cooking spray (or rubbed in butter) and coated with a light layer of cake flour. Bake in a preheated oven set to 350 degrees F until a toothpick in the center comes out clean, approximately 30-35 minutes for a 10 inch round.

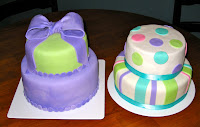
As you can see from the pictures, I made this cake a two-layer cake (as pictured, the purple and green cake), where each layer was made from two cake rounds. This cake recipe makes two 10 inch rounds. I doubled this recipe to make the cake as pictured. After the rounds cooled, I filled them with cherry preserves and iced them with a chocolate-cherry buttercream frosting before covering in fondant.

Even though this cake calls on the use of an unusual ingredient – Montmorency tart cherry juice – this recipe is well worth the time and effort it takes to acquire this product, and you won’t be disappointed. Enjoy!