Monday, November 1, 2010

Chocolate Cheesecake Brownies


How easy is it to make brownies out of a box, fudgey or cakey, however they are described on the box? Easy. Special? Not really, but tasty, why of course! Over time, there are a few things I’ve vowed to myself in the kitchen. Lately, I try not to use vegetable oil or canola oil while cooking. Some how making muffins and pouring a cup of liquid, slippery oil, stored at room temperature with a shelf life of forever into my developing batter just doesn’t make me want to dig in no matter how delicious the kitchen smells when the baked goods are done. So you’ll probably notice that my recipes posted here do not typically call for any oil, instead I usually substitute melted butter or margarine. Anyway, a tangent!

The other practice I try to stay away from is buying mixes to make desserts. The idea that something I make could only be made by me (or by you, in fact!) and is not commercially available in any ol' grocery store is special. Plus, I like tweaking things to my tastes and knowing what goes into my treats. Which brings us to the point, what do I do when I want to make something that mixes are readily available for, and ultimately produce a delicious, reproducible, and easy treat? I certainly don’t want to belabor something and make a home made recipe take forever with iffy results when I know I could spend $3.69 plus 45 minutes of my time to make something that is pretty likely to be edible and yield praise from family members or coworkers. Brownies are one of those desserts for me. Seemingly not difficult, but once I step outside the (proverbial) brownie box, my from-scratch baking experience yields crusty squares that stick to the pan or something that is plain and simply NOT awesome – not exactly what I had bargained for. So I set out to craft a decadent and fudgey brownie that has character and is worth keeping the ingredients in your house to make, is easy to personalize, and doesn’t take a lot of time to make. I hope you like the results as much as I do!
p.s. Brownies are an awesome dessert because they REALLY are easy! No fancy kitchen equipment here, only a bowl and a spoon. You want to just mix the ingredients until they are incorporated and are lumpy; beating until smooth is not necessary.

Chocolate brownie base:
1 cup butter
2 cups white sugar
4 eggs
2 tsp vanilla extract
2/3 cup cocoa powder
1 cup flour
1/4 tsp salt
1/4 tsp baking powder
1/2 cup -3/4 cup chocolate chips

Cheesecake topping:
1 8 oz package cream cheese
1 egg
1/3 cup white sugar

Melt the cup of butter in a microwave safe large bowl. Add sugar and mix with a big spoon. Add the eggs and and vanilla extract and mix to combine. In a smaller bowl, combine all dry ingredients. Add the mixed, dry ingredients to the butter/sugar/egg, mixing until incorporated - it's ok if a few lumps remain. Add a few more lumps :) by pouring in the chocolate chips and stirring until incorporated. Anywhere from 1/2 cup to 3/4 cup of chocolate chips is fine, so whatever you prefer. Grease a large 9x13 pan with butter and pour in the batter, smooth the top. At this point, if you want to up the fancy-factor, you can add the cheesecake topping. If you are a chocolate purist, then feel free to bake as they are, just perhaps for a few minutes less since they won't be as thick.

If you don't mind diluting your chocolate with some sweet and creamy cream cheese, then pull out a mixer (a hand mixer does a great job for this) and cube your cream cheese in a medium sized bowl, add the egg and the sugar, and mix on med-high speed until the mixture is homogenous, scraping the bowl as necessary. Spoon the cream cheese mixture over the brownie batter, and swirl the cream cheese in with a sharp knife.

Bake at 350 degrees Fahrenheit for 30-35 minutes. If you're after a fudgey brownie, then closer to 30 minutes, and if you're a cakey brownie lover, then around 35 minutes. Try using the toothpick test for a truly cakey brownie - a clean toothpick inserted into the center of the baking pan that comes out clean will yield a cakey brownie... but don't overdo it, 35-37 minutes should be long enough depending on your oven!

Other ways to personalize this recipe:
Instead of opting for cheesecake, try swirling some raspberry jam on the top of the brownie batter prior to cooking. You can also go with the real deal by boiling raspberries (approximately 1 cup) in a small pot, letting cool a little, and then spooning over the dough and swirling. This works well with raspberries as opposed to other fruits, because raspberries have a lot of pectin in them, which is a natural thickener, preventing the fruit from oozing juice all over the top of your tasty, praise-worthy brownies. :)

Enjoy!

Sunday, October 31, 2010

Maple Sugar Sandwich Cookies with Maple Cream Filling


About five years ago I lived for a year in New York City, the home of everything you could ever want. This goes for clothing and other goodies, and certainly food and food related purchases are no exception. I lived on the Upper West Side, not so far away from the Garden of Eden, an awesome specialty grocery store that had so many high quality and special items. It was here I purchased my fun bottle of maple extract, that five years later has survived three moves and remained unopened until just last week. Hmm. Perhaps that wasn’t the most useful purchase. But I’ll tell you what, carting that bottle around with me for 5 years was totally worth it after making these delicious maple cookies! What was so special that made me suddenly see the maple light? A friend of mine was in Canada and returned home with the most delicious sugar cookies filled with a maple buttercream frosting… I could never eat just one! So, I made my own never-ending supply. ☺

Maple Sugar Cookies
1 and a half cups butter, softened
2 cups white sugar
4 eggs
1 tsp vanilla extract
1 tsp maple extract
5 and 1/3 cups flour
2 tsp baking powder
1 tsp (or less) salt

Cream butter and sugar until fluffy. Beat in the eggs and extracts until smooth, scraping bowl along the way. Stir or mix in the flour, baking powder and salt. At this point you want a sturdy dough that isn't too sticky and can be balled up and rolled out nicely. Knead in a little extra flour if necessary to get this consistency. Cover and refrigerate for 1 hour (and up to overnight). Break dough off in sections, and on a floured (or sugared!) surface, roll dough out to about 1/8 inch thick. Cut out shapes, place on a parchment paper lined cookie sheet, and bake for 6-8 minutes - shorter for softer cookies, longer for crisper. Keep an eye on the edges to avoid burning. I used a flour cutter, but a maple leaf would have been perfect! After they're out of the oven, take them off of the cookie sheet to cool.

Maple Sugar Buttercream Frosting
4 cups powdered sugar
1/2 cup shortening
1/2 cup butter or margarine
1-2 tblsp maple extract
1-2 tblsp maple syrup.

This frosting is to die for... if you have a serious sweet tooth. Prepare this frosting by first combining the shortening and butter and beating with an electric mixer until smooth. Add the powdered sugar one cup at a time, beating after each addition. After two cups of powdered sugar, add the extracts to your taste, keeping in mind that the flavor is enhanced a few hours after preparation. I had thought that most of the flavor would come from the maple syrup, but surprisingly no - a lot of it came from the extract. Both are a welcome addition in these cookies and complement each other well!. After adding the extract and syrup, beat thoroughly and add the last two cups of powdered sugar, one at a time. If the frosting is too thick, beat in warm water, one tablespoon at a time. To frost the cookies, fill a quart sized ziploc bag (or a pastry bag) with the frosting and then cut 1/2 inch off one of the corners and squeeze onto a cookie. Place another cookie on top, press lightly to secure it on top, and maple sandwiches are ready to eat!

Tuesday, June 29, 2010

Chocolate Explosion Cookies


Chocolate Explosion Cookies!
1 cup butter
¾ cup white sugar
½ cup brown sugar
2 eggs
2 tsp vanilla extract
2 cups flour
1 tsp baking soda
½ cup cocoa powder
½ tsp salt
½ cup milk or semi sweet chocolate chips
½ cup white chocolate chips

Cream butter and sugars. Beat in eggs and extract. In a separate smaller bowl, combine flour, cocoa, baking soda, and salt. Combine these dry ingredients into the butter/sugar/egg/extract and mix. Add chocolate chips and stir in. Drop tablespoon sized cookies onto a parchment paper covered cookie sheet and bake at 350 F until the edges are a little darker, approximately 10 minutes.

Red Velvet Cupcakes with Cream Cheese Frosting


Red Velvet Cake
2 ½ cups cake flour
½ tsp salt
2-4 tblsp cocoa (I used 3)
½ cup butter, unsalted
1 ¾ cups sugar
2 large eggs
1 tsp vanilla extract
1 tsp baking soda
1 tsp white vinegar
1 cup buttermilk
2 tblsp or 2 oz red food coloring

Easy Chocolate Ganache


Chocolate Ganache
9 oz chocolate, chopped. Semi sweet or dark is best
1 cup heavy cream
1 tbslp flavoring (optional)

Parmesan Cheese Souffle


Almond Ricotta Cookies with Dried Cherries


Ricotta Cherry Cookies
½ cup Butter
1 ¼ cup sugar
1 egg
8 oz ricotta cheese
1 tsp vanilla extract
1 tsp almond extract
2 cups flour
½ tsp baking powder
½ tsp baking soda
½ cup dried cherries

Preheat the oven to 350 F. Cream the butter and sugar. Add the egg and extracts and mix well. Stir in the ricotta. In a separate small bowl, mix the flour and baking soda and powders. Add the dry ingredients to the ricotta/butter/sugar mixture and mix in. Drop by spoonfuls onto a parchment paper covered cookie sheet and bake about 10 minutes, until edges just begin to brown.

Raspberry Almond Cheesecake with Marzipan Cookie Crust


Almond Raspberry Cheesecake
Crust
1/3 cup almond meal
1 tblsp + 1 tsp marzipan, crumbled
3 tblsp sugar
~1/2 cup crushed sugar or shortbread cookies
3 tblsp butter, melted

Using a food processor or a mallet (I went with the mallet), crush the cookies and combine with the remainder of the dry ingredients. Add enough melted butter (should be approximately 3 tblsp) an mix by hand until it resembles wet sand. Press this mixture into the bottom of a springform pan and bake at 325 F for approximately 15 minutes.

Filling (I never said this was good for you! ☺)
2 pounds (4 packages) cream cheese – you can use light and it won’t change the flavor too much
1 ¼ cups sugar
4 large eggs
1 tsp vanilla extract
2 tsp almond extract
½ cup heavy cream
raspberry jam, 1/3 to ½ cup, for swirling.

Beat cream cheese until smooth. Wipe down beaters mid way through and scrape sides of bowl a few times too, because any lumps will change the texture of the finished cheesecake. Add the sugar gradually and beat until smooth and dissolved, also scraping sides of bowl at least once. Add the eggs one and a time, beat until each egg is incorporated and scrape down the sides of the bowl after each egg addition. The first time I made cheesecake I didn’t do a great job with this and surprisingly it really does make a difference. Add ~ 1/3 cheesecake mixture to the baked crust pan. Drizzle with raspberry jam or sauceand swirl with a toothpick or knife. Add 1/3 more of the cheese mixture, and repeat. Add the last 1/3 of the cheese and do the same to the top of the cake. Bake approximately 1 hour and 10 minutes at 325 in a water bath. Then, after the baking time is up (it will still be a little jiggly), open the over door a few inches and turn the oven off, and let it sit in the oven for one hour more. Take the cheesecake out of the oven and let sit at room temperature until cooled. Place in the fridge for at least four hours, until chilled.

Blackberry Bottom Cake


Happy belated birthday to me! This year for my birthday two of my friends gave me cooking and baking books... hehe I guess they know me very well! :) This recipe was the first I have tried from my William's Sonoma Savoring Desserts baking book, and it was a great way to start off, especially with beautifully ripe summer fruit like blackberries now available!

Blackberry Bottom Cake
1/3 cup butter, unsalted, melted, and cooled
2 cups sugar
1 pint blackberries
1 cup flour
1 tsp baking powder
1/4 tsp salt

Preheat the oven to 350 F. Melt the butter, and add 1 cup sugar, stirring to combine. Spread this butter/sugar mixture on the bottom of a 9 or 10 inch round baking pan (a springform pan works well) and add the blackberries in a single layer on the butter/sugar mixture. Separate the eggs, putting the whites in a large bowl and the yolks in a smaller one. Whisk 1 tblsp melted butter into the yolks and set aside. Using an electric mixer, beat the egg whites just until the form peaks, being careful not to overbeat. Fold the remaining one cup of sugar into the egg whites, about 1/4 at a time. Then fold in the egg yolk mixture about 1/4 at a time. Final fold in the flour mixture 1/4 cup at a time. Pour the batter over the berries and spread to cover evenly. Bake at 350 F until a toothpick comes out of the center cleanly, approximately 30 minutes. Let stand for at least 10 minutes, at which time slide a knife along the inside edge and then invert over a plate and flip the cake out. Best served warm. Enjoy!
Apple Pie


Thursday, April 29, 2010

Savory Herb and Goat Cheese Turnovers


Although this blog has so far featured delicious desserts, baking can be so much more. Even beyond lasagna or other main course, single dish bakes, as far as I'm concerned the oven has earned a rightful spot in the preparation of some of the most stunning and mouth watering appetizers. This past weekend I went to my favorite Spanish tapas restaurant and ordered a small plate of goat cheese empanadas with a drizzle of a tomato based sauce. It is now Thursday and I've been salivating over those empanadas since then! And, in the spirit of expanding my baking repertoire, below you will find a simple and classy savory appetizer, with the total prep time taking about 15 minutes and another 15-20 baking.

Savory Herb and Goat Cheese Tunovers
1 package of Peppridge Farm pastry sheets (2 sheets), room temperature. (Cover with a damp paper towel once unwrapped)
2 4oz packages of fresh goat cheese (President is a good brand)
1 tsp garlic, minced
3/4 tsp basil
1/4 tsp freshly ground pepper
dash salt
dash red pepper flakes
flour, for rolling dough
1 tblsp milk
3 tblsp butter, melted

Preheat oven to 350. Line a baking sheet with either foil or parchment paper. In a medium sized bowl, crumble goat cheese and add garlic, mixing with a fork or your hands. Add basil, pepper, red pepper flakes, and salt to taste (above is a guideline for what I used), and mix well. From one sheet of pastry, cut into thirds along the pre-cut perforations. Taking one of the strips, lay horizontally on a surface lightly dusted with flour. Roll dough very thinly (1/8 inch thick), cut into squares or rectangles with a sharp knife and place the goat cheese mixture in the center of the dough - I used approximately 2 slightly heaping tsp/square. Moisten the edges of the pastry dough with milk, and then fold dough in half to cover the filling and seal edges by pressing together with a finger. If triangle turnovers are made, fold the dough over along the diagonal. Melt butter, and using a pastry brush, brush butter over the tops of the turnovers. Place on the foil or parchment paper covered baking sheet and bake at 350 for 15-20 minutes, or until the edges are golden brown.

Enjoy!

Thursday, April 22, 2010

Marzipan Cherry Scones


I’m actually writing this recipe before I’ve even tasted it – they are still in the oven. I just have this feeling… they will be THAT good! (*UPDATE* they ARE that good!) Today at work, a friend of mine was describing these marzipan scones she enjoys at a local coffee shop that she frequents. I had already been thinking about baking something for our weekly Friday meeting. At this point all I heard was “… marzipan… scones… delicious… my favorite,” and I was sold. I’ve never made scones before, so it was a perfect challenge! Design a delicious scone recipe that incorporates only my most favorite and beloved flavor in baking… marzipan.

The perfect scone recipe for me would have more than just the sweet scent of almond with flecks of flavorful marzipan, but the tang of cherries. To give the recipe an extra zing, I soaked the dried cherries in amaretto first, allowing the cherries to soak up the delicious, sweet almond flavor of the amaretto.

Marzipan Cherry Scones
1/2 cup dried cherries, soaked in amaretto (I used a mixture of bing and montmerency cherries)
2 cups all purpose flour
2 tsp baking powder
1/3 cup sugar
¼ tsp salt
6 tblsp butter, cubed and cold
1/3 cup heavy cream (or half and half)
1 large egg
½ tsp almond extract
1/3 cup marzipan, sweetened to desired sweetness by kneading in confectioner’s sugar
turbinado sugar, for decoration

Mix dry ingredients together in a large bowl. Using a pastry cutter, cut in the cubed butter and about half of the marzipan until they resembles small peas. Add the cherries and the remaining marzipan in small chunks. In a small bowl, combine almond extract, heavy cream, and egg and lightly beat together. Pour wet ingredients, reserving about 1 tablespoon, over the dry ingredients and mix together until the mixture holds together (do not over-mix). Turn dough out onto a floured surface and form a circular disc. Cut into 8 pieces from the center, as one would cut a pie. Place on a parchment paper lined cookie sheet and brush with remaining cream and egg mixture. Top with turbinado sugar for decoration. Bake in a preheated oven at 375 for 15-20 minutes, or until light golden brown around the edges.

Monday, April 19, 2010

Almond Spritz Butter Cookies


You know how sometimes baking leaves you with random misfit ingredients that just don’t make the cut? Making that delicious custard ice cream leaves you with 7 egg whites that you just don’t know what to do with, or how making the cakes described above, including the cherry and/or spice cake leaves you with a fridge full of egg yolks? This post uses up some extra egg yolks, resulting in a most delicious and simple dinner party approved cookie – the spritz cookie. When I finished making all of the spice and cherry cakes for the baby shower, I had a whopping total of 16 egg yolks left over, so I had some serious make-up baking to do! Spritz cookies immediately (well ok, after the many thoughts of ice cream) came to mind. As a child my mom would make spritz butter cookies in the shape of trees every Christmas, complete with green sprinkles. And, these almond flavored butter cookies made with her old cookie press never even lasted long enough to make it to the plate destined for Santa and his reindeer. But, given the current excess egg yolk situation, I decided to break from the mold and make these cookies in, yes, April, and choose another cookie press shape.

Almond Spritz Butter Cookies
1 cup of butter (do not substitute more than ½ cup with margarine as it changes the texture of the cookie and the aesthetic of the pressed shape)
2/3 cup sugar
3 egg yolks
1 tsp almond extract
2 ½ cup flour

Heat oven to 400 degrees F. Using an electric mixer, mix butter, almond extract and sugar until thoroughly light and fluffy. Mix in the flour in several stages – in the end you want a thick dough that hold together well – not excessively sticky. If you have to use a little more flour than the recipe recommends, do so one tablespoon at a time.

Take pieces of the dough and roll it into tube and fit it into the cookie press. Press out the cookies onto a foil lined cookie sheet and bake for 7-10 minutes until light golden brown on the edges.

*If you do not have a cookie press, roll out the cookie dough between two pieces of parchment paper (NOT FLOUR) and cut out using cookie cutters. Alternatively, bed bath and beyond sells cookie presses for $20. Enjoy!

Wednesday, April 14, 2010

Spice Cake


The sister cake to the previous post’s cherry cake is the spice cake. A velvety, mildly spicy spice cake iced with a vanilla buttercream including the same spices in the cake made for a harmonious blend of flavor and another cake well-worth making. I'll post the vanilla-spice buttercream in another post.

Spice Cake
1 stick butter, softened
1½ cups sugar
2 tsp vanilla extract
4 egg whites
1¼ cup milk (I use half ½ and ½, half 1% milk)
2¼ cups cake flour
1 tblsp baking powder
1½ tsp cinnamon
1 tsp nutmeg
1 tsp cloves
½ tsp ginger
pinch salt

Cream butter and sugar with a mixer until light and fluffy and then some – approximately 3 minutes. Add the vanilla extract, beating thoroughly. In a separate bowl, whisk together the egg whites and the milk/½ and ½. In another separate bowl, combine all dry ingredients and mix well. Add 1/3 of the dry ingredients to the butter/sugar/juice mixture, and mix until incorporated. Add half of the wet ingredients and mix until incorporated, scraping the sides of the bowl as needed. Add half of the remaining dry ingredients and again mix until incorporated. Add the last half of the wet ingredients, mixing until incorporated. Lastly, add the remaining dry ingredients and mix until incorporated, and then mix for an extra few minutes at the end. Pour batter into cake pans prepared by spraying with nonstick cooking spray (or rubbed in butter) and coated with a light layer of cake flour. Bake in a preheated oven set to 350 degrees F until a toothpick in the center comes out clean, approximately 30-35 minutes for a 10 inch round.

As the pictures show, I made this cake a two-layer cake where each layer was made from two cake rounds. This cake recipe makes two 10 inch rounds. I doubled this recipe to make the cake as pictured. After the rounds cooled, I filled and iced them with a vanilla spice buttercream frosting before covering in fondant.

Cherry Cake


For most of March I had my baking cut out for me – it was the month of perfecting several recipes for a job I was recruited for. A friend of mine was organizing a baby shower for a close friend, and asked me to bake a cake to serve 40 people and that could withstand a 3 and a half hour car ride, in either of her friend’s favorite cake flavors: cherry or spice cake. This already sounded like a challenge! I decided for ease in transport, I would make two, two layer cakes, one spice and one cherry, so we could all have our cake and eat it too… literally. ☺ I didn’t have to subject myself to the nightmares of a 3 layer cake toppling over with abrupt braking on the highway during the 3+ hour car ride, and the mother-to-be could enjoy both of her favorites on her special day. I had never made a cherry cake, and knew that this would be a perfect challenge for me – reinvent a cherry cake bursting with authentic cherry flavor and pieces of the tart fruit to match. Spice cake, on the other hand, seemed like it would be less of a challenge, so I knew where I would start. I decided to bake a few practice cakes to get the cherry cake down, which ended up being a harder job than I had anticipated, but full of humor nonetheless. Of course I have to share those with you, but, feel free to skip down to the widely enjoyed and approved final cake recipe below. ☺ I know you will enjoy it too.

The first two efforts found me back at the local grocery store, purchasing marachino cherries and at Trader Joe’s buying several bags of the Montmorency dried tart cherries, which I’ve been known to eat by the fistful… they are just that good. I made one cake in which I made a white cake batter, and added some of the marachino cherry juice as well as diced up marachino cherries. This cake was much too subtle and had an artificial cherry flavor… maybe great for a small child’s cake, but as this cake was to suit 40 grown adults, I kept looking. I made a white cake in which I rehydrated the dried cherries and added them to the batter. This ended up being more like a coffee cake with cherries that sunk to the bottom because they were too heavy. Tasted good, especially the bites at the bottom of the cake, ☺ but just not very cherry. It tasted like what it was – a white cake with some moist cherries in it.

Then, I decided to get creative. Where can I buy cherry juice? Cherry extract? Hmmm… I spent some time online, and settled on two products. From King Arthur Flour (www.kingarthurflour.com) I purchased their “natural” cherry flavored extract. Looking back on the experience I already cringe at the thought of baking with this stuff EVER again. I also did some research and found that concentrated cherry juice is sold by heath food stores (and the online the web from http://www.brownwoodacres.com) and is intended as a supplement for joint pain, but the list of ingredients is still only one thing: Montmorency Tart cherry juice. I happily purchased both cherry items and eagerly awaited their arrival on my doorstep to test in baking. Finally they arrived, and I quickly got to work making a white cake containing the concentrated cherry juice and rehydrated cherry pieces that I cut into smaller pieces in hopes they would not sink to the bottom. I whipped this up, and tasted the batter… and DAMN it was good! But of course, I couldn’t let it be! I went and added 1/8 tsp of the cherry extract…1/8 tsp! Hardly ANYTHING! I tasted the batter… eh… too early to tell. Certainly tasted like cherries, but was it a good cherry flavor?

Finally it was done and I rushed to try it. It tasted like a fake cherry factory exploded in the cake. Andreas tasted it, and even he, my reliable cake testing guinea pig told me he felt like he was going to be sick. So I guess adding the natural cherry extract produced a flavor of anything but? And, all with 1/8th a tsp!! In the end, I didn’t have the heart to bring the sample cake to work, for my co-workers/taste testers to only belittle my cake-making self esteem even more, or worse, make them too feel nauseous. The cake instead found a home in the garbage, and I chalked it up to a ‘learning experience.’

But, despite this cake going extremely wrong, it seemed easy to fix. Don’t add any of the cherry extract. In addition, the cherry juice is made from tart cherries, so I thought my next (and what I was pretty convinced would be my last!) test cake should have an increased amount of sugar to balance the tartness of the juice. Additionally, to keep the pieces of rehydrated dried cherries far away from the bottom of my cake pan, I decided I would dredge the chopped up cherries in cake flour before lightly mixing them into the finished batter. I excitedly made this cake, promised Andreas it would be good, and we both tried it. I am proud to say it was the best cherry cake I’ve ever eaten, and being a person who prefers fruit to chocolate, this is one of my most favorite cakes I have ever eaten. Even Andreas, who eternally will prefer chocolate cake to anything else, agreed it was delicious and should be tried by all. My co-workers/taste testers all agreed, and it is with that I share probably my most prized recipe yet with you… and I daresay it was well earned after all those sample cakes!

Cherry Cake
1 stick butter, softened
2 cups sugar
2 tsp almond extract
½ cup Montmorency cherry juice (http://www.brownwoodacres.com)
4 egg whites
1½ cup milk (I use half ½ and ½, half 1% milk)
2 ½ cups cake flour
1 tblsp baking powder
pinch salt
½ cup – 1 cup dried Monmorency cherries, rehydrated in water and dredged in cake flour

Cream butter and sugar with a mixer until light and fluffy and then some – approximately 3 minutes. Add the cherry juice and the almond extract, beating thoroughly. In a separate bowl, whisk together the egg whites and the milk/½ and ½. In another separate bowl, combine all dry ingredients and mix well. Add 1/3 of the dry ingredients to the butter/sugar/juice mixture, and mix until incorporated. Add half of the wet ingredients and mix until incorporated, scraping the sides of the bowl as needed. Add half of the remaining dry ingredients and again mix until incorporated. Add the last half of the wet ingredients, mixing until incorporated. Lastly, add the remaining dry ingredients and mix until incorporated, and then mix for an extra few minutes at the end. In a small, microwave safe bowl, add dried cherries and cover with water. Cook for a few minutes in the microwave to rehydrate, drain cherries, and cut into smaller pieces (each cherry, maybe 4 pieces). Towel dry cherry pieces, and then mix with cake flour to coat. Add cherries to the cake batter and lightly stir in with a spoon. Pour batter into cake pans prepared by spraying with nonstick cooking spray (or rubbed in butter) and coated with a light layer of cake flour. Bake in a preheated oven set to 350 degrees F until a toothpick in the center comes out clean, approximately 30-35 minutes for a 10 inch round.

As you can see from the pictures, I made this cake a two-layer cake (as pictured, the purple and green cake), where each layer was made from two cake rounds. This cake recipe makes two 10 inch rounds. I doubled this recipe to make the cake as pictured. After the rounds cooled, I filled them with cherry preserves and iced them with a chocolate-cherry buttercream frosting before covering in fondant.

Even though this cake calls on the use of an unusual ingredient – Montmorency tart cherry juice – this recipe is well worth the time and effort it takes to acquire this product, and you won’t be disappointed. Enjoy!

Thursday, March 18, 2010

Marzipan FIlled Sugar Cookies


Mmmm. Marzipan. Marzi-what? These cookies will hopefully give you a fabulous introduction to marizpan if you have not already tried the cherry-almond braided Danish.

Just saying Marzipan makes my mouth water and my mood lighten. I realize this is a big generalization, but if there was ONE European baking or dessert product that is not fully appreciated on this side of the Atlantic it would be marzipan. Sure, we’re familiar with almonds, as they make plenty of appearances in biscotti and we all know a dash of almond extract can go a long way in adding something special to coffee cakes or cookies, but it just is not the same as infusing a dessert with the fragrant and tasty flavor of marzipan. Infact, I’d say we Americans are most familiar with marzipan straight up as molded, brightly colored small fruit and animal (and other) shaped candies in Italian bakeries. But, this intensely almond, moldable paste/dough is popular in Europe paired with breads, chocolates, and is even used to adorn cakes similarly to the now-equivalent but much less flavorful fondant. It wasn’t until I moved to the Northeast (and yes, I admit, even more recently having German coworkers and a German boyfriend!) that I really began to appreciate this gem of a treat for not only its taste but its wide appeal on the dessert plate and palate from Turkey to Bangladesh to Germany, and everywhere in between.

Then it would come to you as no surprise that my next goal was to create a dessert with marzipan or almond paste that could be enjoyed by both non-Americans and Americans alike, and hence the marzipan filled sugar cookies were born, but not without some streamlining first! First and foremost, when you decide to try making these cookies, you will find yourself standing in the baking aisle at the grocery store, gazing at your almond paste and marzipan options. What is the difference between almond paste and marzipan anyway? Almond paste is typically not as sweet as marzipan, as marzipan has more sugar already mixed in, and it also does not have as smooth a texture as marzipan. For this recipe, I prefer to use almond paste and then mix in some egg and sugar to get just the right texture and flavor that will work well to be incorporated into the cookie, but if you would like to use marzipan, just be aware that you might want to use less sugar. But back to the intent grocery store gaze. Odense makes fantastic marzipan sold in tubes and is awesome for other recipes that call for marzipan, but for almond paste, Solo makes a nice can that works great in this recipe. So, even though this recipe uses Solo almond paste in a can, I will still refer to this recipe as marizpan cookies as the name just has that special zing. ☺

I was inspired by sugar drop cookies (cookies that do not require cutters) for the initial recipe, and modified it to include a healthy dose of almond extract. Stage two of my vision included taking a small piece of almond paste mixture and then placing it in the middle of two dollops of cookie dough, thinking it would spread out and become perfectly enrobed during the baking process. Fortunately, the recipes for both the cookie dough base and the almond paste filling were absolutely delicious both separately (Ok! I admit, I ate more than a few bites of the cookie dough!) and combined in cookie form, but it took a few tries to get cookies that looked as delicious as they tasted. Below are the recipes for the filling and the dough, as well as the play-by-play development to creating cookies that you’ll feel guilty to devour. ☺

Almond sugar cookie dough
1 tblsp. Almond extract
1 tsp vanilla extract
1 egg
1 tsp baking soda
½ tsp baking powder
1½ Cup Sugar
2¾ Cup Flour + 2 tblsp
1 Cup butter or margarine, softened (I used margarine)

In a small bowl, combine the baking powder, soda, and flour. In a large bowl using an electric mixer, cream sugar and margarine/butter until smooth. Beat in the almond and vanilla extracts and egg. Add the dry ingredients to the large bowl and mix well. If the dough is still moist, mix in flour one tablespoon at a time. Ultimately you want dough that is slightly sticky but still balls up, and scoops easily. When baking, bake in an oven preheated to 350 for 10-12 minutes (see below for details).

Almond Paste Filling
1 can (8 oz) Solo Almond Paste
2 tblsp egg substitute or egg white
6 tblsp powdered sugar

First and foremost, depending on your almond taste, an entire can of almond paste may yield a little extra, although for me that is not a problem. ☺ Scoop/dig the almond paste out of the can, and mash it up with a spoon in a medium sized bowl. Add the egg substitute (yes, I stock this in my kitchen for quick and easy baking needs, as well as for my health) to the almond paste and mash it in – you will probably feel like it will be difficult if not impossible to fully homogenize the egg/almond paste mixture, but I promise, it should only take a few minutes! Then, add in the powdered sugar to taste (5-6 tablspoons is perfect!). Next, the assembly! Please see below for the evolution of the perfect assembly of cookie dough and filling! (Or, just skip down to stage 3)

Stage one: My first attempt to generate edible and attractive cookies yielded a plate full of those on the left of the above pictures. To make these, I first cut parchment paper to the size of my cookie sheet, and then placed a ball of dough about the size of a teaspoon on the paper. Next, I took some almond paste about the size of a nickel rolled into a ball and placed it directly on top of the cookie dough, and topped the cookie dough/almond paste blob with another teaspoon sized dollop of cookie dough. As it probably does not surprise you, these cookies ended up looking like a pancake with a small circle or square of butter on the top, rather than what they were supposed to be: a chewy cookie with a stripe of almond running through them!

Stage two: Now, how to get rid of the bulge reminiscent of a cube of butter underneath the exterior of the cookie? Hmmm. I tried to use a little less cookie dough, turn the temperature down on the oven to limit overzealous cookie spreading, and I upped the amount of the almond paste to the size of a quarter and did not spend a lot of time rolling it into a ball. And, much to my surprise, the cookie looked basically the same, with just an increase in the variability of cookie shape (the middle cookie in the above picture).

Stage three… SUCCESS: After two batches of deliciously tasty but misshapen cookies, my fingers were crossed for the last attempt. I put a small bit of dough approximately the size of a small teaspoon on the parchment paper and flattened it a little, and then took my quarter sized ball of almond paste and flattened it out into a disk, and then placed this on top of the cookie dough. This might get a little tricky as the almond paste will be a little sticky; do not worry, just add a little powdered sugar to it to reduce the stick, or rub a little onto your hands to reduce the hand-stick. Then, place some cookie dough on top of the almond paste, approximately the size of a tablespoon, and pop the cookie sheet into the oven and cook at 350 for 10-12 minutes. As a small variation, and to see what works best for you, you can alternate – bigger amount of dough on the bottom, then covered with almond paste disc, and topped off with the smaller amount of dough – this may result in a little exposure of the almond paste during cooking, and may produce slightly different looking cookies. Lastly, take these cookies out of the oven right after the cookies are golden brown around the edges (~12 minutes, for a crunchy cookie) or just before this happens (~10 minutes, for a chewy cookie). The final product may also be delicious with chocolate drizzled over it, or just the way it is described here, represented by the cookie on the right in the top photo and highlighted in all its glory in the bottom photo.

Saturday, February 27, 2010

Guinness Chocolate Cake with Kahlua-Chocolate Ganache


A few weeks ago I got this idea in my head that one could make a cake with beer and it would taste good, and I haven’t been able to forget this crazy idea. Maybe it isn’t so crazy, as I googled beer cake and did find a few possibilities. I decided to make my own chocolate-beer cake, selecting Guinness as the beer of choice – a tasty, chocolate stout that would mix well with chocolate, deepening the flavor of the cake, and being just as tasty to drink what didn’t end up in the cake. ☺ I also experimented with using less sugar, to bring out the flavor the Guinness, and the result was a moist cake with a subtle beer flavor that was complemented well with the sweeter Kahlua ganache topping (Baileys would have been great in the ganache as well!) Overall, this recipe yielded 6 small bundts and two cupcakes with the leftover batter.

Guinness Chocolate Cake
2 cups all purpose flour
½ Cup butter flavored shortening
1¼ - 2 Cups sugar (I used less because I wanted the flavor of the Guinness to come out more but adding the full 2 cups would also be delicious ☺)
¾ Cup unsweetened cocoa
2 tsp baking soda
1½ tsp baking powder
1 cup ½ and ½
2 eggs
1¼ cup Guinness
2½ tsp Vanilla

In a large bowl, cream together Crisco and sugar until light and fluffy. Add eggs and beat well. In a separate smaller bowl, combine flour, salt, baking soda and powder until mixed. To creamed Crisco/sugar/eggs, add dry ingredients and liquids, and mix well. Grease pans (I chose small bundt pans) and bake in a preheated 350 degree oven on the top rackfor approximately 30 minutes or until toothpick inserted in the center comes out clean. Let cool and remove from pan, level the bottom of the bundts with a serrated knife, turn right-side up and glaze with ganache:

Chocolate-Kahlua Ganache
2 oz bittersweet chocolate
1 tblsp butter
2 tblsp ½ and ½
1 tblsp Kahlua
1 tblsp powdered sugar

Melt chocolate and butter in the microwave, mixing periodically to ensure even melting and to make sure the chocolate doesn’t over-cook. You can also use a double boiler on the stove to avoid obliterating your chocolate, but a microwave is completely sufficient as long as you have either a watchful eye or are an impatient cook (like me!). Stir in ½ and ½, powdered sugar and kahlua, mixing well. Spoon/drizzle over small bundts. Additionally, melt a small amount of white chocolate, and drizzle over the top of the chocolate-kahlua glaze.

Thursday, February 25, 2010

Cherry-Almond Danish Braid


This recipe is a staple of mine, making a few appearances at parties recently where it was quickly gobbled up, reminding me how much it should be shared. This recipe is delicious. Easy. Deliciously easy, and easily customizable. This recipe came from a Better Homes and Gardens Off the Shelf Baking cookbook. Why off the shelf? This recipe uses storebought puff pastry dough, as well as almond paste and cherry preserves… makes me feel just a tiny bit guilty posting this when I try to specialize in homemade goodies, but it is so good it must be shared, especially for the options in personalizing it!

Cherry-Almond Danish Pastry Braid
2 sheets frozen puff pastry, thawed
1 8 oz can almond paste
¼ cup sugar
1 egg, separated (I use the equivalent egg white substitute for the entire recipe)
½ Cup cherry preserves
almond slices for decorating
raw, course sugar, for decorating

Per Puff Pastry Sheet:
Line large baking sheet with parchment paper. Unfold the pastry sheet. Prepare the almond filling by beating almond paste with sugar and egg white with an electric mixer until combined. Spread the almond paste mixture (about half, although I find that half is a little much) on the center panel of the unfolded pastry sheet, staying away from the edges of this panel by approximately half of an inch on all sides. Spoon and spread cherry preserves over the top of the almond filling to your liking (recipe calls for approximately ¼ cup per pastry, but a little more is always a good thing!). Using kitchen shears (so easy with these!), cut strips approximately 1 inch wide towards the center filling in the two outside panels. Starting at one end, fold the cut strips in over the center filling, alternating between sides. Using the egg yolk or more egg substitute, brush over braids. Sprinkle course sugar and sliced almonds over the top. Cover with plastic wrap and let stand for approximately 15 or 20 minutes. Bake in an oven preheated to 375 for 30-35 minutes or until golden brown.
Customizing options:
*Use fresh fruit instead of preserves
*Instead of almond paste, spread lemon curd and top with raspberries or blackberries
*Instead of almond paste, use a cream cheese filling topped with fresh fruit or preserves
*Slice apples and toss with sugar and cinnamon before filling danish

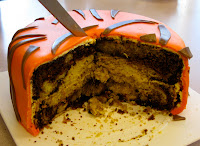
Orange Chocolate Swirl Tiger Cake


First, a few weeks ago marked the perfect occasion to bake – February 14. No, not Valentine’s Day, but Chinese New Year! An occasion for resolutions, reconciliation and wishes of a prosperous year full of luck, wealth and good fortune. And, this day being the start of the year of the Tiger! A good friend and coworker of mine from China also happened to have her Birthday just before Chinese New Year, so I was sold – let’s bake a cake... a tiger cake! For this occasion, I tested out the combination of an orange cake with the classic chocolate described in a past blog entry, swirled together and sealed underneath a layer of fondant with a tangy, sweet orange buttercream frosting. To up the potential tasty-factor of this cake, the orange cake and the butterceram frosting was flavored with oranges picked straight off the tree from my parent’s backyard in Arizona. I was lucky enough for my mom to visit me in Boston at the beginning of February and come bearing the seasonal Arizona gifts of home-grown grapefruit, lemons, and oranges. The cake was made from two 10 inch rounds, combining chocolate swirled with orange cake, using Dorie Greenspan’s ‘Perfect Party Cake’ (Published in her Baking: From My Home to Yours) as inspiration for the orange cake. Although Dorie’s recipe was heavily adapted, I find that her mixing and incorporation instructions are perfect as she described, and the combination of the ingredients as written below plus her technical advice (also written below) produces an amazing, beautiful cake with a fine, fluffy crumb, complete with a sweet, orange scent. One final note: This cake comes together with TWO cake recipes, the orange that follows (as written, one whole recipe), but also a half-recipe of the Decadent chocolate cake described in another blog here. To make this cake, prepare both recipe batters individually, grease and flour two 10 inch baking rounds, and alternate scooping each batter into the round (details to follow). This cake is also so delcious as it is without the swirling with chocolate cake, so it can be made and enjoyed as it is written.

Fragrant Orange Cake
3¼ tsp. orange zest
1½ Cup sugar
2¼ Cup + 1 tblsp cake flour
1 tblsp. Baking powder
½ tsp salt
1¼ Cup Half and Half
4 large egg whites
1 stick butter, unsalted, room temp
¼ Cup orange juice.

Heat the oven to 350. Spray two 10 inch baking rounds with cooking spray and coat with flour.
Sift together the flour, salt and baking powder. In a separate medium bowl, whisk together the egg whites and milk. Combine the sugar and the orange zest in a separate, large bowl and rub together the orange zest and the sugar until the mixture is fragrant. Add the butter to the orange/sugar mixture and beat on medium-high with an electric mixer for 3 minutes, until the mixture is very light and airy (do not worry, you will not OVER beat!). Beat in the orange juice until thoroughly incorporated. Add one third of the flour mixture, and beat well on medium speed. Beat in half of the half and half/egg mixture. Then, beat in half of the remaining flour mixture, and once incorporated, beat in the remainder of the half and half/egg mixture until thoroughly mixed in. Beat in the remainder of the dry ingredients, and once incorporated, beat the entire mixture for an additional 2 minutes to fully aerate the batter. Alternate pouring the orange batter and the chocolate batter into each of the two rounds and swirl around a knife a few times in the batter. Bake until a toothpick inserted in the cake comes out clean; approximately 30-40 minutes.

After baking, this cake was sealed with an orange buttercream with oranges straight from the backyard tree, and covered with home made orange fondant.

Orange Buttercream:
½ C shortening
½ C Butter or margarine
1 dash salt
5¼ - 5½ C confectioner’s sugar
3 tsp orange zest
3-4 tblsp orange juice.

Cream butter and shortening and then add orange zest. Add sugar, one cup at a time, beating on medium speed. Add orange juice 1 tblsp at a time and beat on high until blended and a consistency that suits your needs. Once the cake has cooled, fill the bottom layer with buttercream, and put top layer on the cake. Coat the stacked layers with the buttercream and let dry for at least a few hours before coating with fondant. The tiger stripes on the cake were made with chocolate fondant to finish it off.

Happy Birthday, YueYang, and Happy New Year! ☺

Sunday, January 31, 2010

Chocolate Sherry Cream Bar Cookies


Whew! two posts in one day! In addition to trying the chai tea cookies for the first time yesterday, I was inspired to try another recipe also listed in the Better Homes and Gardens Special Publications: Ultimate Cookies. The recipe, titled Chocolate-and-sherry cream bars (NOTE: originally formatted for a 15x10 baking dish, all references below are for the halved recipe that would suit the 8x8 or 9x9 baking dish size) really had my attention with its mouth-watering, centerpiece-esque photo, but similar to the chai tea cookies, this recipe ended up getting a makeover. I'll post my equally as mouth watering recipe below, but please know that the original exists out there for reference. I found the chocolate bottom a success, so I simply scaled down the original recipe for the fudgy bottom layer and conjured up a completely different recipe for the sherry cream layer.

Chocolate Sherry Cream Bar Cookies (suitable for 8X8 or 9X9 square baking pan)
Chocolate Bar
1/2 cup butter
2 ounces semi-sweet or dark chocolate
2 eggs, lightly beaten
1 cup granulated sugar
1 tsp vanilla
1/2 cup all purpose flour

Preheat oven to 350 (the prep for this recipe goes really quickly! I'm a fan!) In a double boiler over low or medium heat, heat the chocolate and butter, stirring to aid in even melting. Once melted, remove from heat, and mix in the eggs, sugar, and vanilla until combined. Mix in the flour, and pour into a greased baking pan. Bake for approximately 25 minutes, or until an inserted toothpick comes out clean. Set aside and let cool to room temperature.

Sherry Cream (to cover an 8x8 or 9x9 baking dish)
At this point, this was one of those recipes that it wasn't until everything was all combined that I realized the recipe as written would never work and it needed to be made over. The original recipe, scaled down for a 9x9 dish, called for 2 cups of powdered sugar, a 1/8 cup sherry, and 1/8 cup half and half or light cream, whipped up, would never reach the fluffy, mousse-like texture that I so desperately craved, but instead had the consistency more of a gooey royal icing. I didn't feel comfortable risking the success of the fudgy bottom layer by topping it with this, so I scrapped it in favor of my own sherry cream recipe, which follows:

Approximately 1 cup Heavy Cream for whipping
a pinch cream of tartar
4 tablespoons powdered sugar
1/4 cup cream sherry

In the large bowl of a stand mixer (this can also be done with a hand mixer or by hand) fitted with the whisk, add the heavy cream and cream of tartar and whisk on high speed until soft peaks begin to form. Just after the soft peaks form, add 3 tablespoons powdered sugar and about half of the sherry, and whisk until incorporated. At this point, dig in - does it taste enough like sherry to suit you? Is it sweet enough? If the answer to either of these questions is no, then add more powdered sugar and/or sherry and whip again. Taste periodically and add more of either if necessary - I added a total of 4 tablespoons powdered sugar and a little less than 1/4 cup sherry, but a little extra of either is fine. Once you are pleased with the flavor, whisk the cream mixture until it is thickened; the peaks should be sturdy.

Scoop the above sherry cream mixture onto the chocolate bottom layer, smooth the top and drizzle melted chocolate over the top (alternatively, as the original recipe states, scaled down for a 9x9 dish, melt 1/4 cup chocolate chips with 1 tablespoon butter, add 2 tsp sherry, and then drizzle over the top... excellent too!). Place completed dessert in the refrigerator for at least an hour to firm up, before cutting and serving. Enjoy!

Modifications:
This recipe could also be easily modified to suit a gluten free diet. Try using a flourless chocolate cake recipe for the bottom layer!

Chai tea cookies


It has been awhile since my last post, but rest assured, my baking efforts have not slowed! January has been a busy month, both for baking and for working. January is the month for PhD student recruitment in the PhD program I am affiliated with, and I hosted a faculty/recruit dinner at our house last weekend, where some new recipes were on the program. This past Monday I also had my yearly advisory meeting at which my progress was evaluated, and I'm happy to say that things went well, giving me one more occasion to bake! :) And, last night was a girl's night amongst a few friends, where we were not short on the baked goodies, good conversations, and movies.

I promised at the beginning of this blog I'd be true and post the trials of a true bakie. I'd by lying if I said everything turned out amazingly, perfectly edible each time, or I didn't have to throw away my efforts midway through and adapt a recipe once I realized the recipe as written was not tested. That brings up an interesting point to me - sometimes recipes ARE NOT TESTED! Which is one of the reasons why I am a big fan of sources like America's Test Kitchen, who pride themselves on rigorously seeking perfection, and also the countless people that have their own blogs to share things that they know work and even more importantly, things that don't. I thought I'd start with one of the recipes I used last night, for the first time... Chai Tea Cookies, that was taken from the Better Homes and Gardens Special Publication: Ultimate Cookies. I've made a few other recipes from this book, and although the recipes are based on unique ideas, baking these cookies ultimately means being savvy with recipe adaptation and rolling with the punches. Here is the recipe, as written:

Chai Tea Moons
1 Cup Butter
1 Cup packed brown sugar
1 tablespoon chair leaf tea, finely ground
1 tsp vanilla
1/2 tsp baking soda
1/8 tsp salt
2 and 1/4 cup all purpose flour

In a large mixing bowl, beat butter with an electric mixer on med-high speed for 30 sec. Andd brown sugar, chai tea, vanilla, baking soda and salt. Beat until light and fluffy. Beat in the flour. Divide dough in half, wrap in plastic wrap, and chill 1 hour.

Preheat oven to 375, and on a lightly floured surface, roll dough to 1/4 inch thick and cut using a cookie cutter. Place one inch apart on an ungreased cookie sheet and bake for 8-10 minutes, until edges are light brown and firm.

Butter Icing (see below)
beat 1/3 cup butter, until softened with an electric mixer. Add 1 cup of powdered sugar, beating well. Beat in 1 tablespoon milk and 1 tsp vanilla. Add two more cups of powdered sugar, beating well.

Looking at the recipe, I was pretty excited! An exotic flavored cookie - we all know how amazingly awesome chai tea tastes... sweet, a little spicy... yum! I started mixing everything and tasted the mix before adding the flour. chai tea? You wouldn't have guessed. Something different, yes, but not decidedly chai. I added an extra tablespoon of chai tea leaves. And one more thing, when they say finely ground, THEY MEAN IT! Unless you want to eat cookies that later involve the use of a toothpick or dental floss to dig the twigs out, I'd recommend using a spice grinder or mortar and pestle until you have a powder. This will also enhance the flavors. Also, the flour is just a little much - I'd add 2 cups and then roll the cookies out in the remaining 1/4 cup of flour. As written, these cookies end up being a little crispy. A subtle chai taste, in a crispy cookie. Frost and they'll soften up, but they are even nice without frosting.

As for the frosting, I made chai cookies, I want chai frosting! So, I took my milk and heated it up in the microwave in a small container, and steeped another tablespoon of tea in the milk for a few minutes. Then, when I added it to the butter and powdered sugar, I was now increasing the chai factor.

Bottom line, these are good, but still need a few adaptations in texture (I want more chewy and less crispy!) and more chai flavor. I think the solution to the texture may be using half white sugar and half brown sugar (think about duplicating the chewy chocolate chip cookies that call for both) and also finding a way to incorporate a small amount of liquid (preferably water or milk that the tea steeped in) into the cookie dough. So, I'll continue to play around with this and let you know what I find. And, given the idea of steeping the tea in liquid, I think I hear chai tea cakes calling my name! ...

Happy baking!

Thursday, January 7, 2010

Decadent Chocolate Cake


In preparation for my first paid birthday cake endeavor, I made the chocolate and teal fondants a few days ago (previous post, see the finished cake above!), and today I baked the cakes, to assemble and decorate for Saturday. Developing this chocolate cake recipe has been a labor of love, and I'm excited to share it with you!

This recipe originally began as a chocolate mocha cake, but as coffee isn't for everyone, it has since been adapted into a 100% chocolate cake. Decadent, delicious, dark chocolate cake. Yum.

Let me start by telling you a little about this delicious chocolate cake. When I bake, I like to incorporate slightly unusual, less standard ingredients to produce a more unusual flavor. For example, this cake is made from both unsweetened cocoa powder, but also hot chocolate mix (try varying the flavor of hot chocolate or use instant coffee beverage flavor in as well!). By replacing some of the cocoa powder with hot chocolate mix, the chocolate note is lightened (not gone! Just less acidic and bitter), creating a warm flavor that allows for the permeation of other flavors, such as vanilla (which I love!). In combination with the other ingredients, this cake is a moist chocolate cake that is not overly sweet and still has depth of flavor beyond that of chocolate – the one cake that even those who prefer white cake will enjoy!

Decadent Chocolate Cake:

½ Cup Butter Flavored Crisco
2 cups Sugar
2 eggs
2 cups flour (I use all purpose)
2 tsp baking soda
1 ½ tsp baking powder
pinch salt
approximately 1 tblsp vanilla (I use Penzy’s double strength vanilla)
1 cup half and half (I prefer half and half, but milk can substitute)
1 cup hot chocolate made with Water (or skim/1% milk)
half of a chocolate bar (dark chocolate, not baking chocolate)
½ cup (a little more than ½ cup) unsweetened cocoa
¼ cup (a little less than ¼ cup) hot chocolate mix (ratio of unsweetened cocoa to hot chocolate mix can be varied to suit taste)

In a large bowl, cream together Crisco and sugar until light and fluffy. Add eggs and beat well. In a separate smaller bowl, combine flour, salt, baking soda and powder until mixed. To creamed Crisco/sugar/eggs, add dry ingredients and liquids, and mix well. Coat pans with cooking spray and then flour, add batter, and bake at 350 on top oven rack for 30 minutes or until toothpick comes out clean. This recipe will yield two 10 inch baking rounds suitable for creating a layered cake.

Now comes the fun part! Decorating the cakes! Of course, chocolate makes everything easy! As you know, I am a repeat user of Peggy Weaver’s Fondant (see http://whatscookingamerica.net/PegW/Fondant.htm) - it yields very easy to work with, superior tasting, and significantly cheaper (but more time consuming!) fondant than what is commercially available. As described in the last post, for this cake, I used the above cake recipe and made two 10 inch rounds, and two 8 inch rounds. The two 8 and 10 inch rounds were then filled and crumb coated with chocolate buttercream frosting. The bottom 10 inch rounds were then covered with chocolate fondant and the top 8 inch rounds were covered with teal fondant and matching decorations finished the look. Happy Birthday Caroline!

Saturday, January 2, 2010

Birthday Cake Surprise: Chocolate Fondant


Today is a landmark day for me! In addition to starting this blog, just a few days ago I received my much anticipated Christmas present from my parents – a professional kitchenaid mixer – my new baking companion. Up until this point, my love of baking has been nurtured by many a hand-kneading of dough, hand mixing up batter, and then in the more recent years the addition of the handheld mixer (a gift from my grandmother, during college). I actually love using the hand mixer – there are some things that just come together so nicely, or using the hand mixer is just so practical for other things, such as making deviled eggs, or whipping up royal icing… and maybe my hand mixer has gotten so much use that I am even familiar and fond of the smell of the little motor working so hard to help me make something tasty and memorable! But, there is another reason why today is a landmark day: after baking and decorating fondant covered cakes for special occasions for over a year for friends, I have secured my first paying customer! ☺ A co-worker of mine has asked me to bake a cake for his daughter’s 14th birthday. I was told her favorite color is turquoise, and the cake should be chocolate, and the rest was left to me. Since I enjoy baking layered cakes, I decided to go with the 10 inch rounds and the 8 inch rounds, stacked, with the bottom layer decorated in teal fondant, and the top in chocolate fondant (I had recently re-discovered my love for chocolate fondant, see the recipe below!). Since I am still learning the artistry that is cake making, I often try to finish the cake with ribbon details to hide blemishes or seams – something I’d totally recommend to anyone who wants to try fondant! (I've included a picture from a past cake with the chocolate fondant, and ribbon, for an example.) For a first time fondant user, I’d start with regular fondant, but chocolate is also very simple. Again, this recipe is adapted from Peggy Weaver’s website
http://whatscookingamerica.net/PegW/Fondant.htm.

Chocolate fondant:
16 ounces white mini marshmallows
2-5 tablespoons warm water (I usually start with two)
2 pound bag powdered sugar, minus 2 or 3 cups (to be added in stages)
1-2 cups unsweetened cocoa powder
Crisco, open and ready for dipping!

As Peggy suggests, once you’ve got your marshamallows in the microwave, coat your hands (even around nails and in between fingers) with plain Crisco (make sure it is not butter flavored or just butter, as this will change the color of your fondant to a strange pale yellow, and if you wish to dye it with food coloring (gels or paste are best), it will also augment the color. Also coat your working surface with Crisco. Once the marshmallows are melted (see Peggy’s website for details) begin to stir in the powdered sugar. I’d start with a few cups of powdered sugar, and then add 1 cup of unsweetened cocoa powder. When the mixing becomes difficult, turn out your marshmallowy-sugary blob onto your worksurface and start kneading. Peggy makes it sound easier than it is, but just keep going! Once you’ve kneaded in the 1 cup of cocoa powder, evaluate it: does it look dark enough to suit my needs? Does it taste enough like chocolate to suit my needs? It the answer is no to either of these questions, then add another ¼ cup or ½ cup of cocoa. Any time the dough feels sticky, add more powdered sugar (or cocoa!) and continue with the kneading process. Keep going until it is a smooth, elastic ball. I also find this recipe easier to make and handle during the kneading process if it is halved, and depending on your baking needs, you might wish to do this too. Also, if the fondant becomes too hard to work with, or you made regular white fondant and then wish to dye it, then pop it in the microwave for a very short (30 sec or less) period of time to soften it up. Fondant does also keep well for extended periods of time, so I find it easy to make the fondant a day or two in advance so I have it ready to go when I need it, like this time! Sometimes fondant can also change color as it dries, so it is nice to have a few days to evaluate if the final color (leave a tiny amount the size of a dime or so out at room temperature overnight) does change after some time has passed.

Here we go!

It is 2010. A new year, a new decade. Over the past ten years, I've become more than just an occasional baker, but rather a very interested baker that seeks perfection in taste and appearance and has developed a few tricks up my sleeve to reach those goals in the kitchen. I've cultivated an interest in using my oven for more than just to 'have something to eat.' I search for and adapt recipes as well as create my own, and I want to share with you what's fun and what works! Please join me on my adventure as I share my chronicles of invention and adaptation that have found their way into my oven, and hopefully yours too.